Elasticsearch: Cluster Setup

Elasticsearch requires very little configuration. We can run it as stand alone, just by installing it without any config change. But in case of cluster setup we need to do minor config changes.

Elastic.co provides comprehensive setup instruction which can be found here

Before we start:

Master node: Responsible for cluster management like discovering healthy nodes and adding or removing them from a cluster.

Data node: Stores data and runs search and aggregation.

node name / cluster name: Elasticsearch will assign node / cluster name automatically, but its better to change it, for better visibility and understanding.

Configuring cluster:

Lets setup cluster with 3 nodes, 1 master and two data nodes. Let assume master node IP as 192.168.100.10 and two data nodes IP’s are 192.168.100.20, 192.168.100.30 receptively.

On Master node:

Sudo vi /etc/elasticsearch/elasticsearch.yml

 cluster.name: "sit_env"
 #node name, please change it as required.
 node.name: "sit_node_1" 
 #path where data will be saved
 path.data: /var/lib/elasticsearch
 #path for log file, can be changed as required.
 path.logs: /var/log/elasticsearch
 node.master: true
 node.data: false
 #default number of shards
 index.number_of_shards:6
 #default number of replicas 1 ( total data nodes - 1)
 index.number_of_replicas:1
 #IP address of host.
 network.host: 192.168.100.10
 #port
 http.port:9200
 #path for backup snapshot to be saved.
 path.repo: /mnt/elasticsearch/elasticsearch_backup
 #IP of all nodes
 discovery.zen.ping.unicast.hosts: ["192.168.100.10","192.168.100.20", "192.168.100.30"]

save and exit

sudo service elasticsearch restart
Data node 1:

 cluster.name: "sit_env"
 #node name, please change it as required.
 node.name: "sit_node_2" 
 #path where data will be saved
 path.data: /var/lib/elasticsearch
 #path for log file, can be changed as required.
 path.logs: /var/log/elasticsearch
 node.master: true
 node.data: true
 #default number of shards
 index.number_of_shards:6
 #default number of replicas 1 ( total data nodes - 1)
 index.number_of_replicas:1
 #IP address of host.
 network.host: 192.168.100.20
 #port
 http.port:9200
 #path for backup snapshot to be saved.
 path.repo: /mnt/elasticsearch/elasticsearch_backup
 #IP of all nodes
 discovery.zen.ping.unicast.hosts: ["192.168.100.10","192.168.100.20", "192.168.100.30"] 

save and exit

sudo service elasticsearch restart

Data node 2:

 cluster.name: "sit_env"
 #node name, please change it as required.
 node.name: "sit_node_3" 
 #path where data will be saved
 path.data: /var/lib/elasticsearch
 #path for log file, can be changed as required.
 path.logs: /var/log/elasticsearch
 node.master: true
 node.data: true
 #default number of shards
 index.number_of_shards:6
 #default number of replicas 1 ( total data nodes - 1)
 index.number_of_replicas:1
 #IP address of host.
 network.host: 192.168.100.30
 #port
 http.port:9200
 #path for backup snapshot to be saved.
 path.repo: /mnt/elasticsearch/elasticsearch_backup
 #IP of all nodes
 discovery.zen.ping.unicast.hosts: ["192.168.100.10","192.168.100.20", "192.168.100.30"]  

save and exit

sudo service elasticsearch restart

How to install munin to monitor server ( CPU, MYSQL, memory and others ) Centos 7?

munin_cast

Monitor server with Munin:

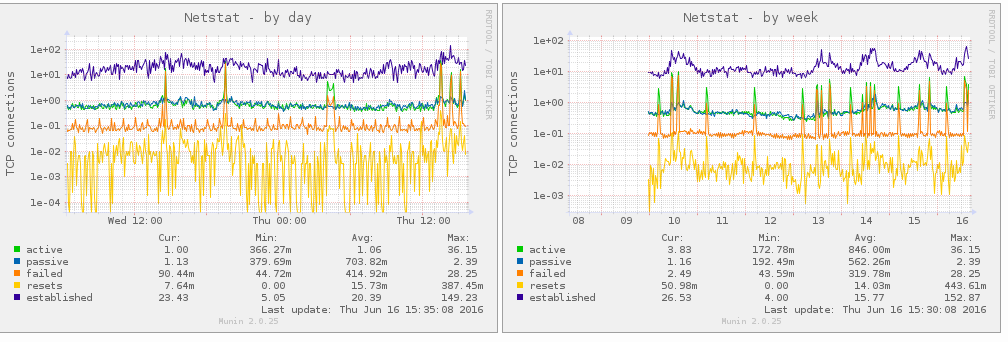
Munin is a system, network, and infrastructure monitoring tool, which records different server component activites in given interaval and prodive nice looking graph.

Munin has two component, one is called munin and second one is called munin-node. munin-node aggregate data from each node its installed pass to munin which is used to monitor data. So to install in multiple node we can just install munin-node and use one server with munin to monitor multiple nodes.

Step 1:

To install munin make sure you have apache installed in your server. munin needs apache to display graph frontend.

Install munin and munin-node

yum install -y munin munin-node

Step 2:

Make sure munin-node starts on ever server boot up so adding it to system demon.

systemctl enable munin-node

Example: Setup local and remote servers

Munin allows to monitor server where it is installed and also, we can add remote servers to it. This will provide us to monitor mulitple servers in one interface.

Step 1: Monitor local server:
We can create groups in munin master by different servers. So lets create group for server where it is installed. Lets call it master for easy naming conventions.

vi /etc/munin.conf

look for line

[localhost.localdomain]
    address 127.0.0.1
    use_node_name yes

Change it to following

[Master]
    address 127.0.0.1
    use_node_name yes

Its not require that you need to change above line but it will have to distingust between different munin node we are monitoring.

Step 2:

Configure apache to allow munin to be accessible from browsers. By default munin comes with apache config file and its has setting for htaccess password protections. We can disable this by commenting line but its good to protect munin web access by password. So lets create htaccess password just for munin with username admin and password ‘muninpassword’

htpassd /etc/munin/munin-htpasswd admin

this will prompt for password so we will comply by putting password as ‘muninpassword’

Step 3:

vi /etc/httpd/conf.d/munin.conf

Alias /munin /var/www/html/munin
<directory /var/www/html/munin>
Options FollowSymLinks
    AllowOverride None
    Order allow,deny
    Allow from all
########################################
# comment line below if we dont want to use authentication
########################################3
AuthUserFile /etc/munin/munin-htpasswd #
AuthName "admin" # username we just created
AuthType Basic
require valid-user
##########################################3
#Auth code ends here
######################################3

ExpiresActive On
ExpiresDefault M310

</directory>
ScriptAlias /munin-cgi/munin-cgi-graph /var/www/cgi-bin/munin-cgi-graph
<Location /munin-cgi/munin-cgi-graph>
  AuthUserFile /etc/munin/munin-htpasswd
  AuthName "admin"
  AuthType Basic
  require valid-user
</Location>

Make sure we have “admin” as username in AuthName section. If we dont need password protection then we can comment these Whole auth section. Above config file came as default with munin installation. We can change it as per our requirement.
We have setup /munin as aias in above example, that mean we can access munin by http://<website>/munin

Step 4: Restart munin-node and apache

service munin-node restart
service httpd restart


Step 5: access remote server:

http://<your server ip or host name>/munin

it will prompt for username and password.
and we will see graph and our master group.

Munin Master Master

Add remote server to munin Master:

Step 1: Install munin-node in remote server

yum install munin-node

Step 2:  point to munin master

vi /etc/munin/munin-node.conf

Look for line which looks like

allow ^127\.0\.0\.1$

replace with your munin master ip. ( If your master ip is 210.210.210.210 then change line like:

allow ^210\.210\.210\.210$

save and restart munin node

service munin-node restart


Step 3: Add your remote munin-node in your master. You can add this just below your Master node config line.

vi /etc/munin/munin.conf


[RemoteServer]
 address 210.210.210.209
 use_node_name yes

restart apache and munin-node

Adding more plugins like

MySql :

Munin comes with set of plugins those are active, which are located in /etc/munin/plugins. There are many plugins which comes with munin like MySql which are not active by default.

We can add plugins to munin by installing new plugins or copying plugins from /usr/share/munin/plugins/ to /etc/munin/plugins. Best way to add will be by symbolic link.

For example to add mysql to munin we can do following. Make sure mysql plugin exists in /usr/share/munin/plugins/ and then we create symbolic link for it .

ls -s /usr/share/munin/plugins/mysql_threads /etc/munin/plugins/mysql_threads

Munin Backup Backup


Make sure master can do telnet on remote on port 4949.

It will take some time for munin for changes to take effect.